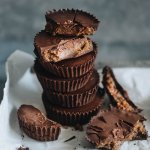
Miso Peanut Butter Cups
These miso peanut butter cups combine dark chocolate and a sweet-savory filling. They’ve got a more refined flavor than the store-bought version and yield to the tooth with a satisfying crack.
Servings: 12 cups
Ingredients
- 3 bars dark chocolate 90 grams per bar (see note)
- 6 Tablespoons peanut butter natural, unsalted, unsweetened, stirred
- 6 Tablespoons ground flaxseed
- 2 Tablespoons maple syrup
- 2 Tablespoons miso red or white, without dashi or other fish ingredients
Instructions
- Combine the peanut butter, flaxseed, maple syrup, and miso in a bowl. Stir well. Knead by hand to form an even dough. Taste a small amount of the dough and add maple syrup if not sweet enough. If dough becomes too wet or sticky, add flaxseed and knead until manageable.
- Divide the dough into 12 roughly equal-sized spheres and place them on a plate.
- Prepare 12 muffin liners in a muffin pan or on the counter.
- Break one bar of chocolate into small pieces and place them in a microwave-safe bowl. Microwave the chocolate for one minute. Remove the bowl and stir. Cook in the microwave again for 30 seconds and stir again. Be careful - the bowl can get very hot.
- Once the chocolate is evenly melted and smooth, use a spoon to add chocolate to a single muffin liner. Add just enough chocolate to form a thin layer on the bottom of the liner. You can use the spoon to spread the chocolate out.
- Take one of the peanut butter dough balls and press it into a disc that is roughly the same diameter as the muffin liner. Place the peanut butter disc into the muffin liner with the layer of chocolate. Move the disc around in every direction so that a layer of chocolate forms around the outside of the disc.
- Spoon more melted chocolate onto the top of the peanut butter disc until it is completely covered. Again, you can use the spoon to spread the chocolate if needed.
- Continue to assemble the rest of the cups in the same way. Melting more chocolate as needed. Each 90-gram bar should be enough for 4-6 cups, depending on your usage.
- When all the cups have been assembled, place the muffin pan in the freezer. After 20 minutes, the cups will be ready to eat.
Notes
It’s important to choose a type of dark chocolate that you’re comfortable eating by itself. They can vary a lot in their bitterness depending on the cacao percentage. If you’re not a fan of really bitter chocolate, I’d say to choose one in the range of 55-60%.
I experimented with different types ranging from 57% to 85% and they all worked fine. The higher the cacao content, the smoother the appearance of the finished product.
I used three bars of chocolate when I made the recipe, but there were differences in the number of cups I got from each bar. They ranged from 4 to 6 cups per bar.
It’s really helpful to have a muffin tin to hold the muffin liners. It keeps the cups round-shaped and is a convenient way to move them into the freezer. But it’s not totally necessary. You really just need the paper liners and some space in the freezer.
Don’t melt all the chocolate at once. If you ever played with melted sugar, you know that it can do strange things. The same goes for melted chocolate. If you melt it all and something goes even slightly wrong, it can make the whole batch unusable. I’d melt either half a bar or a whole bar, broken into small pieces, at any given time.
The finished cups keep their shape best when cold. Keep them in the fridge or freezer or use a cooler if transporting them.