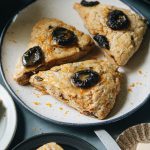
Vegan Orange and Prune Scones
Orange and Prune Scones are bright and citrusy, spiced with nutmeg and cinnamon, and on the less-sweet side. The texture is fluffy and crumbly and moist.
Servings: 8 scones
Equipment
- cheese grater
- baking sheet
- parchment
- glass mixing bowl preferably pre-chilled in freezer
- fridge and freezer with enough space for a baking sheet
Ingredients
- 360 grams all-purpose flour plus more for dusting
- 5 ½ teaspoons baking powder
- 1 teaspoon salt
- 3 Tablespoons caster sugar
- 1 teaspoon ground cinnamon
- 1 teaspoon ground nutmeg
- 115 grams vegan butter (about 1 stick) frozen and grated
- 150 grams prunes pitted, about 18 prunes, half diced and half halved into disks
- Zest from 1 medium orange about 1 ½ Tablespoons
- 255 milliliters plant milk preferably unsweetened and unflavored, plus more for brushing
Glaze
- 2 Tablespoons vegan butter melted
- ¾ cup powdered sugar
- 1 ½ Tablespoons plant milk preferably unsweetened and unflavored
- ¼ Tablespoon vanilla extract
- 1 ½ Tablespoons orange juice
- Zest from ½ medium orange (2-3 teaspoons)
Instructions
- Combine the flour, baking powder, salt, caster sugar, cinnamon, and nutmeg in a large chilled glass bowl. Whisk to combine thoroughly. Rub in the grated vegan butter with forks until the mixture resembles fine breadcrumbs. Gently stir in the diced prunes and orange zest until distributed evenly.
- Gradually stir in the milk until you have an integrated, lumpy dough ball. Stop as soon as the dough is consistent with no dry spots or remaining liquid. Do not overstir or overwork. (See note on dough consistency.)
- Place the dough ball onto a lightly floured working surface. Gently roll the dough into a round, even 2-centimeter thick disk, doing as little work on the dough as possible. Spread the halved prunes on the top and press them very gently onto the surface. Transfer the dough disk upside down onto a parchment-lined baking sheet and put it into the refrigerator for 30 minutes.
- Begin preheating the oven to 220C (425F). Remove the baking sheet from the fridge and cut the dough like a pizza into 8 wedges. Lift the parchment off the baking sheet, place it on the counter, and line the baking sheet with a new piece of parchment. Transfer the cut wedges, right-side-up so that the halved prunes face up, onto the freshly lined baking sheet, spaced about 4 centimeters apart. Brush the tops, but not the sides, of the wedges evenly with plant milk.
- Put the baking sheet with the dough wedges in the freezer for 15 minutes while the oven preheats.
- Remove the sheet from the freezer and bake for 15-25 minutes until the tops are golden brown.
- Allow the fresh scones to cool before serving. (See note on doneness.) Serve with the glaze if desired.
- You may want to let the scones air dry for up to 24 hours before sealing them in an airtight container, which they should be good for 5 days in. (See note on storage.)
Make the Glaze
- Combine all the glaze ingredients in a small bowl. Whisk to mix well. You can either drizzle the glaze onto the cooled scones or serve it alongside them as a spread.
Notes
You can adjust the consistency of the dough before moving forward. It should be fairly wet, and lumps are totally fine. Add a bit more plant milk if it’s too dry, or a bit more flour if too sticky to handle. You may need a silicone scraper to remove the dough from the bowl.
The time needed to bake the scones can vary on a few different factors, including the dough, your oven temperament, and your freezer temperature. I like to go by appearance and internal temperature. The scones should be light golden brown, if not darker, and the internal temperature should approach 93C (200F), which you can measure with a probe thermometer. It’s also OK to bake the scones on the lighter side, as shown in the photos, so they can take a bit more toasting when you reheat them later.
I like my scones with a little bit of crust on the outside, so I leave them out for a day before sealing them up. If you prefer them more on the moist side, like a muffin, you can seal them up as soon as they’ve cooled.