These plant-based Chocolate Coconut PB&J Bars have four layers of goodness with classic flavors and a variety of pleasant textures. This may sound like a kid-dish, but the flavors are tuned to mature taste buds and the bars are not especially sweet. They’re simple to make and don’t require any baking. Just mix each layer, assemble, put in the freezer for half an hour, and they’re ready to enjoy!

Is this kid food? You’re how old again?
I have a strange relationship with what’s known in the US as “kid food”. As someone who appreciates complexity and nuance in food, I don’t like that restaurants (sometimes fancy ones) have separate sections on the menu for children with items such as hot dogs and chicken fingers.
I think kid food is intended to minimize conflict and risk, but it avoids an opportunity to grow and discover new things. I’m grateful that my parents encouraged me to try all sorts of different foods when I was pretty young – kimchi, sushi, the occasional sip of beer. I might not have loved them the first time I tried them, but I appreciated them more and more with each successive try.
Peanut butter and jelly sandwiches, most often made with processed, nutritionless, soulless white bread and sugar- and preservative- loaded ingredients, probably also fall into the kid food category. I ate those growing up as well. For better or for worse, a liking for this total kid food has been etched deeply into my brain. A part of me, the four-year-old part, is pretty happy to taste PB&J, even now in my thirties, even if it’s disguised as something else.

Chocolate coconut PB&J bars as an homage to kid food
When I put together this recipe, I wanted to call back to those childhood memories, yet still make a dessert that is fit for mature taste buds. Using bitter dark chocolate, a bittersweet jam, and very mildly sweetened coconut and peanut butter layers, you really notice the original flavors and the contrast between them. The coconut and peanut butter are just barely sweetened. The flavor profile of this dessert is more bitter, sour, and savory than it is just sweet.
Texture for its own sake
I was also careful to curate a few different textures in the bars. Having eaten my share of Ben & Jerry’s ice cream (their vegan flavors are great) I like to include different textures for its own sake. Ben, one of the founders of that company, has a condition that prevents him from tasting or smelling food, and this led him to put ingredients with varying textures and mouthfeels in all their ice creams.
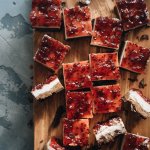
The textures in these bars range from hard to soft, from the bottom to the top. The bottom layer of chilled dark chocolate has a satisfying snap to it. The layer on top of that, peanut butter and flaxseed, has a dense fudge-like texture. Next comes the coconut layer, which is light, fluffy and cool, like cheesecake. On top is a thin layer of jam, which is light and sticky.

Making these chocolate coconut PB&J bars
The process of making these bars is quite straightforward. The bottom layer is just microwave-melted chocolate, poured into a small cake pan. You mix the peanut butter layer in a bowl, shape it to the size of the pan, but don’t place it in yet. The coconut layer is less dense, so you’ll need to spread it carefully on top of the peanut butter layer. Then place the combined peanut butter and coconut layers into the pan. And then the jam layer is just that, spread thinly on top of the coconut.
Once the layers have been assembled in the pan, you put the pan in the freezer for at least 30 minutes, cut the bar into squares, and enjoy.

Some cooking notes
I recommend using a less sweet jam to get the best flavor contrast with the other layers. I used red currant and it was great. Citrus marmalade should also be very tasty.
For best results, use a peanut butter with no added sugar or salt and a dark chocolate with a cacao percentage of at least 55%.
It is important to use unsweetened coconut cream, not coconut milk. Coconut milk won’t produce the intended consistency. DO NOT use Coco Lopez either – it is loaded with sugar and will yield very different results.
The bars will stay together fine for a few hours at room temperature, but they will soften. Keep them chilled in the fridge or freezer until you’re ready to serve them.
These bars have four of the primary flavors – sweet, savory, bitter, and sour. If you’re feeling adventurous and want to add spicy to the mix, you can dust the jelly layer (very) lightly with chile powder.
I like to cut these bars small to make one-bite petit-four-style desserts. Because the flavor is quite concentrated, you may also like to cut them small as well.

You might also enjoy
My other dessert recipe right now is similar to this one – Miso Peanut Butter Cups. Check it out if you’re interested in a dessert with some deep umami.
While not technically a dessert, my Crispy Roasted Sweet Potatoes are sweet and gooey like brownies. But with no sugar added. There’s definitely some dessert-level satisfaction there.
While I admit that desserts aren’t my strong suit at this point, I’m going to dive into it in the coming months. Stay tuned for more sweet plant-based treats!
As always, let me know if you have any feedback or questions in the comments below.
Chocolate Coconut PB&J Bars
Ingredients
- 2 bars dark chocolate at least 55% cacao and a total of about 180 grams
- 3/4 cup natural peanut butter
- 3/4 cup ground flaxseed
- 1/2 cup maple syrup separated
- 3/4 cup coconut flour
- 3/4 cup coconut cream unsweetened
- 3/4 cup fruit jam
Instructions
- Prepare a medium-sized square cake pan (about 8x8 inches), a mixing bowl, a cutting board, and a small bowl for microwaving the chocolate.
- Combine the peanut butter, flaxseed, and half of the maple syrup in the mixing bowl. Mix well until it forms a clay-like dough. Knead by hand on the cutting board until the consistency is even. Transfer the peanut butter dough to the cake pan and press it into the bottom to form a layer of even thickness. Place the cutting board on top of the pan and carefully turn them both upside down, to transfer the peanut butter layer back onto the cutting board.
- Wipe the mixing bowl clean if any residue is left in it.
- Combine the coconut flour, coconut cream, and the remainder of the maple syrup in the mixing bowl. Stir well until consistency is uniform.
- Use a spatula, spoon, or scraper to carefully spread the coconut mixture evenly on top of the peanut butter layer. Don’t press too hard, or you may distort the peanut butter layer. You want both of these layers to be the same shape as the cake pan.
- Break apart the chocolate bars into squares, and place half a bar’s worth of squares in the small bowl. Microwave on high for 45 seconds. Check on the chocolate and give it a stir. If it doesn’t melt within a few seconds of stirring, microwave for 15 more seconds, check, and stir again. Repeat until the chocolate is just melted. Pour the chocolate into the cake pan, using a silicone scraper to transfer as much as possible.
- Repeat this process with the rest of the chocolate to form an even layer of chocolate in the bottom of the pan.
- Use two spatulas (and the help of another person, if able) to transfer the combined peanut butter and coconut layers onto the chocolate layer. It may also help to use a sheet of parchment as a transfer aid. Be careful not to put too much pressure on the melted chocolate, as it might cause the layer to be uneven in the end. The added layers should fit snugly into the cake pan.
- Carefully spread the jam evenly on top of the coconut layer.
- Place cake pan in the freezer for at least 30 minutes. At this point you can cut and serve the bars or continue to store them until you plan to serve.

Is there a reason the chocolate layer can’t go between the peanut butter and coconut or somewhere else? I’m not sure I understand the putting it in and taking it out, I’m sure there’s a reason though. Thanks
Thanks for your question, Lynne. I decided to put the chocolate on the bottom because it’s the most rigid and I wanted the texture to go from soft to hard, top to bottom. It was a mouthfeel goal. And I already knew that chocolate separates cleanly from the pan after it’s frozen, so it was low-risk to put chocolate on the bottom.
I think it could work if you want to put the peanut butter on the bottom, but I’m not sure if the peanut butter layer will separate from the pan as cleanly as chocolate. If you do put peanut butter on the bottom, I might spray a thin layer of oil on the pan first, just to be safe.